Surviving the migration to Office 365 (m365) in a linux-hostile environment

At work we were just migrated to o365 (‘M365’ as they call it), and :

* they’ve disabled forwarding (so can’t automatically forward my mail to e.g. a gmail account)

* they’ve disabled access for all email clients other than Outlook

This happened half a year ago to the students at Umeå, and here’s the solution Mats Wahlberg (Physics and Applied Mathematics) sent me:

1. Get evolution-ews

 — on thunderbird you have the non-free (as in beer) options of OWL for exchange and ExQuilla

— DAVmail may also be a solution, but I haven’t managed to get it to work. It will act as a layer between your mail client (e.g. thunderbird) and the EWS server, allowing you to continue using e.g. thunderbird without having to install anything.

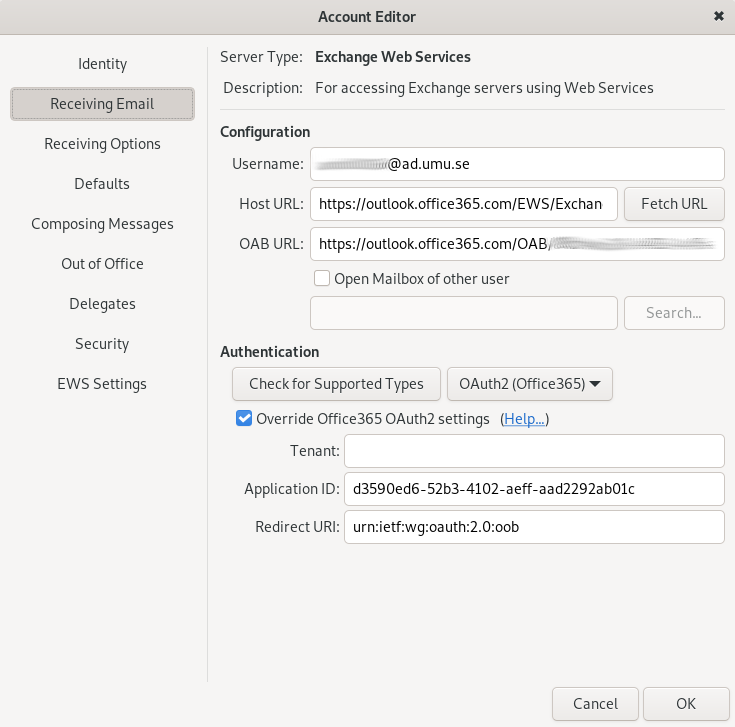
2. Create a ‘New Mail Account’:

Identity: do whatever is appropriate for your identity. Disable ‘Look up mail server …’

Receiving Email: Add the appropriate username (format: abcd0123@ad.umu.se) for connecting to the mail server.

Host URL: use https://outlook.office365.com/EWS/Exchange.asmx

Authentication type: OAUTH2 (Office 365)

Check ‘Override Office365 OAuth2 settings’

Tenant: leave empty

Application ID: d3590ed6-52b3-4102-aeff-aad2292ab01c

Redirect URI: urn:ietf:wg:oauth:2.0:oob

Then click on Fetch URL. This should populate the OAB URL field.

Done!

What to use?

In my group we use linux exclusively. This is done for a number of reasons, chief of which are that it works best with the best tools for our work, and because I can provide you with limited IT support if you are using Linux. Any other OS and you’re on your own.

So here’s a list of tools that we use on linux and what we use them for:

Writing — latex when possible, libreoffice when not, and WPS when we must deal with office documents.

Spreadsheets — gnumeric (always ask yourself whether a spreadsheet is a good idea — often sed/gawk is better)

Plotting and fitting — gnuplot

Simulation/general maths — Octave

Programming — Python (2.7)

Computational chemistry framework — ECCE

CAS — Maxima

File sharing — UMU has 1 Tb storage for each staff member on One Drive via Office 365, so while it’s not great on linux, this is what we use.


Use those iptables…

If you can’t rely on your local network being firewalled the onus is on you to make sure that you have a firewall running on your computer. On linux you have iptables, which is remarkably easy to use if you have at least a basic understanding of how networking works (and/or google). Without going into details, you REALLY, REALLY. REALLY need to have your OWN firewall running if you are based at Umeå University.

Your needs may vary, but here’s a script that you can put in e.g. /etc/firewall_rules.sh

Have it called from /etc/rc.local so that it starts during boot.

#!/bin/sh
sudo iptables -F #FLUSH
#INPUT
sudo iptables -A INPUT -m conntrack –ctstate ESTABLISHED,RELATED -j ACCEPT #allows network
sudo iptables -A INPUT -i lo -j ACCEPT #127.0.0.1
sudo iptables -A INPUT -s 127.0.0.1 -j ACCEPT
sudo iptables -A INPUT -p tcp –dport ssh -j ACCEPT #ssh -world!
sudo iptables -A INPUT -p icmp –icmp-type 8 -j ACCEPT -s 192.168.1.0/24 #ping
sudo iptables -A INPUT -d 255.255.255.255 -j ACCEPT #broadcast traffic
sudo iptables -A INPUT -m limit –limit 15/minute -j LOG –log-level 7 –log-prefix ” Dropped by firewall ”
sudo iptables -A INPUT -m limit –limit 15/minute -j LOG –log-level 4 –log-prefix “[netfilter]”
sudo iptables -A INPUT -j DROP #drop all else
#OUTPUT
sudo iptables -A OUTPUT -o lo -j ACCEPT #127.0.0.1
sudo iptables -A OUTPUT -j ACCEPT #all outgoing ok
#FORWARD
sudo iptables -A FORWARD -p icmp –icmp-type 8 -j ACCEPT
#Default behaviour
sudo iptables -P INPUT DROP
sudo iptables -P OUTPUT DROP
sudo iptables -P FORWARD DROP
exit 0

ECCE forked, hosted at https://github.com/FriendsofECCE/ECCE

The PNNL developed a Linux code called ECCE (Extensible Computational Chemistry Environment; http://ecce.emsl.pnl.gov/) in the 90s and 00s. Unfortunately, no more resources seem to be made available to maintain the code.

This is a shame since it has some interesting functionality:

  • can be used to prepare input files for gaussian and nwchem
  • can submit jobs either directly or to queue managers (SGE, Slurm)
  • can open and visualise the output

And on top of this it’s open source and runs on Linux.

I and Matt Asplund of BYU have thus decided to try to develop a community maintained version. We have put this at https://github.com/FriendsofECCE/ECCE

In addition to maintaining the code, we also have three standard build environment for which we release precompiled binaries.

You can thus download binaries for Centos 7, Ubuntu LTS 16.04.2 and Debian 8.8, in addition to the source code.

Currently there are three release versions:

7.0 — The unmodified PNNL code

7.0.1 — The PNNL code modified to allow it to compile without any further patching on CentOS, Ubuntu and Debian

7.1.0 — A heavily modified version of the PNNL code that introduces new functionality and fixes old bugs

Microsoft Exchange at UMU on Thunderbird on Linux

NOTE: this may not work if you have a student email address at UmU.

You’ll need to install two add-ons:

  • Lightning — install this via Tools/Add-ons in Thunderbird
  • Exchange EWS Provider — download the .xpi file from here: https://github.com/Ericsson/exchangecalendar/releases, then go to Tools/Add-ons, click the cog-wheel in the upper right corner, next to the search box, and select “Install Add-on from file”

Now to go to Events and Tasks/Calendar in Thunderbird, go to File/New/Calendar, pick On the Network, Next. Pick Microsoft Exchange, Next. Call it whatever you want, and pick the email address associated with it (your UMU email).

Selected Hosted Exchange, Use Exchange’s autodiscovery function, and click Perform autodiscovery. Select https://webmail.ad.umu.se/EWS/Exchange.asmx

Put your CAS ID (along the lines of abcd01234) in the Username box, and click on Check Server and Mailbox

Then click Next. Done!


Modifying ECCE to work with SLURM

In the ECCE file apps/siteconfig/QueueManagers, add

#
QueueManagers:      LoadLeveler \
            Maui \
            EASY \
            PBS \
            LSF \
            Moab \
            SGE \
            Shell\
            Slurm

#

and add this to the end of the file:

###############################################################################
# SLURM
# Simple Linux Utility for Resource Management
#
#
Slurm|submitCommand:           sbatch ##script##
Slurm|cancelCommand:           scancel ##id##
Slurm|queryJobCommand:         squeue
Slurm|queryMachineCommand:     sinfo -p ##queue##
Slurm|queryQueueCommand:       squeue -a
Slurm|queryDiskUsageCommand:   df -k
Slurm|jobIdParseExpression:    .*
Slurm|jobIdParseLeadingText:   job

Also, edit apps/scripts/eccejobmonitor and add (without line numers):

2124 LogMsg "Globus status from eccejobstore: $state";
2125 }
2126 elsif ($q eq 'slurm') 
2127 {
2128 $cmd = "squeue 2>&1";
2129 if (open(QUERY, "$cmd |"))
2130 {
2131 $gotState = 0;
2132 while ()
2133 { 
2134 LogMsg "JobCheck: Slurm qstat line: $_";
2135 if (/^\s*$id/)
2136 {
2137 my $state = (split)[5];
2138 
2139 &MsgSendUp("Slurm job id '$id' in state '$state'");
2140 
2141 if (grep {$state eq $_} qw{R
2142 t})
2143 {
2144 $status = $JOB_STATE_RUNNING;
2145 }
2146 elsif (grep {$state eq $_} qw{PD})
2147 {
2148 $status = $JOB_STATE_PENDING;
2149 }
2150 $gotState = 1;
2151 last;
2152 }
2153 }
2154 if ($gotState == 0)
2155 { 
2156 if ($gJobCheckState != $JOB_STATE_NONE)
2157 {
2158 $status = $JOB_STATE_DONE;
2159 }
2160 }
2161 close QUERY;

Now when you’re adding or modifying a machine with ecce -admin you can select Slurm. You’ll still need to edit your CONFIG.xxxx file after the machine creation and add account information etc.


Kebnekaise/HPC2N with ECCE at UMU

You’ll need to have modified ECCE to work with SLURM first. That’s a separate post.

Make sure to run your jobs in /pfs/nobackup/home/X/Username and use /scratch for /scratch

Once you’ve got ECCE modified for SLURM, this is what goes into your CONFIG.kebnekaise file under apps/siteconfig/

NWChem: /lap/nwchem/6.5/bin/nwchem
Gaussian-03: /hpc2n/eb/software/Core/gaussian/16.A.03-SSE4/g16
perlPath: /usr/local/bin/
qmgrPath: /usr/local/bin/
xappsPath: /usr/local/bin/
Slurm {
#!/bin/bash
#SBATCH -A SNIC2017-X-Y
#SBATCH -c $totalprocs
#SBATCH -n 1
#SBATCH --time=$walltime
#SBATCH --output=job.%J.out
#SBATCH --error=job.%J.err
#SBATCH --job-name=$submitFile
}
Gaussian-03FilesToRemove{ core *.rwf }
Gaussian-03Command{
setenv MODULEPATH ${MODULEPATH}:/hpc2n/eb/modules/all/Core
ml gaussian
g16 < $infile > $outfile
}

Abisko/HPC2N with ECCE at UMU

You’ll need to have modified ECCE to work with SLURM first. That’s a separate post.

Make sure to run your jobs in /pfs/nobackup/home/X/Username and use /scratch for /scratch

Once you’ve got ECCE modified for SLURM, this is what goes into your CONFIG.abisko file under apps/siteconfig/

NWChem: /lap/nwchem/6.5/bin/nwchem
 Gaussian-03: /hpc2n/eb/software/Core/gaussian/16.A.03-SSE4/g16
 perlPath: /usr/local/bin/
 qmgrPath: /usr/local/bin/
 xappsPath: /usr/local/bin/
Slurm {
 #!/bin/bash
 #SBATCH -A SNIC2017-X-Y
 #SBATCH -c $totalprocs
 #SBATCH -n 1
 #SBATCH --time=$walltime
 #SBATCH --output=job.%J.out
 #SBATCH --error=job.%J.err
 #SBATCH --job-name=$submitFile
 }
NWChemFilesToRemove{ core }
NWChemCommand {
 export PATH=/bin:/usr/bin:/sbin:/usr/sbin:/usr/local/bin
 hostname
 srun mpirun -n /lap/nwchem/6.5/bin/nwchem $totalprocs $infile > $outfile
 }
Gaussian-03FilesToRemove{ core *.rwf }
Gaussian-03Command{
 module add gaussian
 srun /hpc2n/eb/software/Core/gaussian/16.A.03-SSE4/g16/g16 < $infile > $outfile
 }

(unformatted:

NWChem: /lap/nwchem/6.5/bin/nwchem
Gaussian-03: /hpc2n/eb/software/Core/gaussian/16.A.03-SSE4/g16
perlPath: /usr/local/bin/
qmgrPath: /usr/local/bin/
xappsPath: /usr/local/bin/

Slurm {
#!/bin/bash
#SBATCH -A SNIC2017-X-Y
#SBATCH -c $totalprocs
#SBATCH -n 1
#SBATCH –time=$walltime
#SBATCH –output=job.%J.out
#SBATCH –error=job.%J.err
#SBATCH –job-name=$submitFile
}

NWChemFilesToRemove{ core }

NWChemCommand {
export PATH=/bin:/usr/bin:/sbin:/usr/sbin:/usr/local/bin
hostname
srun mpirun -n /lap/nwchem/6.5/bin/nwchem $totalprocs $infile > $outfile
}

Gaussian-03FilesToRemove{ core *.rwf }

Gaussian-03Command{
module add gaussian
srun /hpc2n/eb/software/Core/gaussian/16.A.03-SSE4/g16/g16 < $infile > $outfile
}

)

Printing at UMU from Linux

This was done on a debian jessie box with gnome shell

  1. Download the PPD from http://www.openprinting.org/printer/Toshiba/Toshiba-e-Studio_2500c
  2. Go to Print Settings, Unlock and then +Add/Printer
  3. Select Network Printer/Windows Printer via SAMBA
  4. Use smb://kbc-origo.ad.umu.se/kbc-print and make sure to set authentication details. Username should written along the lines of ad.umu.se/abcd0123
  5. Don’t verify, but hit forward.
  6. Under Choose Driver, pick Provide PPD file, and use the file you downloaded in step 1.
  7.  Accept the defaults.
  8.  Due to a new (21/6/2017) and idiotic ‘feature’ of the printing system at UMU (i.e. not linux related) you need to submit the job from a computer account that has the same value as your CAS ID. In plain English: if your linux username is different from your CAS — and it should/will be — you can’t print. To fix this, create /etc/cups/client.conf and put your CAS there, e.g. User abcd1234
  9. You should now be able to print.